Nullsoft Scriptable Install System (NSIS)
OpenBD.Local Windows Runtime environment allows you to package up webapps as complete downloadable applications that will have a presence in the main System Tray.
It ships with everything you need, including the Java Runtime. All you need to do is to supply the OpenBD Web App folder.
OpenBD.Local is Windows Jetty Service container where you can deploy any Java application... and of course fits right in the hand of OpenBD!
To be able to create simple installation of your OpenBD CFML Applications I have made tests with Nullsofts Scriptable Install System (NSIS) which also is an Open Source tool.
This document will try to simplify the basic steps to create NSIS Script for your applications. For this I will use the Oracle Tablespace Report (OTR) as an example on what you need to do and what to think of to get your Installation Tool up-and-running as fast as possible.
- First of all you need to download OpenBD.Local from http://openbd.org/local
- Next is to download the openbd.war from http://openbd.org/downloads/
- Finally download the NSIS Tool from http://nsis.sourceforge.net/Main_Page
Let's get started
Create a folder somewhere. for example C:\Deploy
Unzip the openbdlocal.zip in this folder. It will generate a new subfolder with the name openbd-local.
This you can now rename into whatever you want. In my case I changed the directory name to OpenBD-OTR (I want to push OpenBD and the OTR : )
This folder will contain the openbd.exe and some more files including the webapp directory. In this webapp directory simply unpack the openbd.war. You can decide whether or not to keep the bluedragon/administrator. In my case I need that to setup my Datasources for the OTR. You might use a local Java based DB within your application and could then maybe skip this.
Next you deploy your application in the webapp directory. In the case of OTR I have placed the otr in a subdirectory under webapp eg. C:\Deploy\OpenBD-OTR\otr.
I then edited the index.cfm which comes with the openbd.war to redirect to my otr directory rather than the OpenBD manual, which is the standard setup.
Next you decide what port "your" Jetty should use. Default OpenBD.Local is configured to use the port 32124.
This is located in the openbd-local.ini file. Just change it some port you would like to use. I have chosen the port 8080.
NOTE: Using port 80 on a PC can be problematic depending on other local software. Typical such software could be Skype. Skype is occupying the port 80 and before you spend a lot of time trying to figure out why your OpenBD.Local or OpenBD Desktop don't work on your PC, either shut down Skype or change the port to anything else, just not port 80.
Starting OpenBD.Local
To get your application to run simply double-click on the openbd.exe and you will get a new icon in your system tray. With a right-click on this icon you'll get a menu with an Open and a Exit choice. Open will start your default browser and browse to your web app. If it works, you can exit the OpenBD.Local again.
Time for NSIS
We're assuming you have the NullSoft Installer downloaded. Just install this into its default location. On my Laptop it got installed under C:\Program Files (x86)\NSIS
If you want to stylish the Installer Header with an OpenBD Logo I have prepared the following .BMP image
that you have to save into the directory
C:\Program Files (x86)\NSIS\Contrib\Graphics\Header
 Right-Click and select Save As...
You should find the NSIS program in your Start Menu. Just start it up.

Let's make an installer.
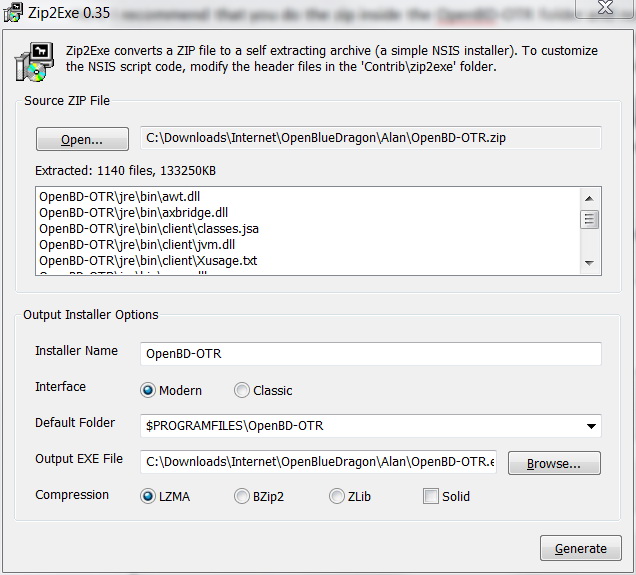
There are 2 ways you can do this. One with very little work on your part, the "Installer based on a ZIP file".
Zip2Exe
For this you simply zip the content of your openbd-local (or in my case OpenBD-OTR) folder.
Here I recommend that you do the zip inside the OpenBD-OTR folder and not one level above. If you do this one level up it will result in a zip file containing paths like OpenBD-OTR\jre etc. Then in the dialog-box you give an Installer Name and a Default Folder which most likely will be something similar OpenBD-OTR.

This will then result in a, not wanted, installation path. E.g. C:\Program Files (x86)\OpenBD-OTR\OpenBD-OTR.
So to avoid this, simply zip the files in the OpenBD-OTR folder.
The other way to create an Installer generates a bit more work for you but you can create much nicer installer and have more control over what the installer will do. I am not going to go into detail on this, rather giving you the basic steps to get this up-and-running fast. It will contain splash screen etc.
Compile NSI scripts
First we need to create a script file with everything needed to install your CFML application.
I created a file otr_setup.nsi and placed it on the same level as my OpenBD-OTR directory
The hard work is to list All files in your application including the OpenBD and the OpenBD.Local.
Therefor I have bundled my otr_setup.nsi within my OTR installer and you can grab this and use it as a base for your own application. Just drop my otr specific files and replace them with yours. You can also grab this reduced openbd_setup.nsi. In this file I have allready taken out the OTR related references and you can start out with this file.
otr_setup.nsi
This file will start with the following
;--------------------------------
;Include Modern UI

  !include "MUI2.nsh"

; The name of the installer
; *** Change this to fit your application name
Name "OpenBD-OTR"

; The file to write
OutFile "setup.exe"

; The default installation directory
; *** InstallDir $PROGRAMFILES\OpenBD-OTR
InstallDir C:\MyCompany\OpenBD-OTR
Here you will change the Name to fit your Application. It will show up at the top of your installer dialog as a header "OpenBD-OTR Setup"
OutFile can also be changed if you rather like to use install.exe for example.
InstallDir can also be changed to something that fits your application. You can place your application under
Program Files which is a Predefined Variable within NSIS.
It does generate problems on Windows Vista - Windows 7 when you try to place your application under the
Program Files directory. Windows is protecting this folder and if your application tries to manipulate
templates inside your app folder or save some file for temporary usage it will not work.
Due to this problem I have decided to place my application under the directory C:\MyCompany\OpenBd-OTR
; Registry key to check for directory (so if you install again, it will
; overwrite the old one automatically)
InstallDirRegKey HKLM "Software\OpenBD-OTR" "Install_Dir"
This is a section for the Windows Registry which will be used later for the un-installer.
; Request application privileges for Windows Vista (user / admin)
RequestExecutionLevel user
This is an issue on Vista and above. Can be set to user or admin. Since there are .ini files around in OpenBD.Local Windows will complain if you set this value to user and install your application under the Program Files directory, so keep this set to admin.
To avoid any problem just don't install under Program Files and you can keep this value set to "user".
; Splash
XPStyle on

Function .onInit
	# the plugins dir is automatically deleted when the installer exits
	InitPluginsDir
	File /oname=$PLUGINSDIR\splash.bmp "c:\Deploy\OpenBD-OTR\webapp\otr\images\installer.bmp"
	#optional
	#File /oname=$PLUGINSDIR\splash.wav "C:\myprog\sound.wav"

	advsplash::show 2000 600 400 0x1856B1 $PLUGINSDIR\splash

	Pop $0 ; $0 has '1' if the user closed the splash screen early,
			; '0' if everything closed normally, and '-1' if some error occurred.
FunctionEnd
The Splash screen can be used or not. If you don't want one, just leave this section out. You can even make sure to get on your users nerves by playing them a wav file when the Splash screen is displayed :)
I created an image for the OTR. The format has to be BMP.

Next we define the pages to be used.
; Pages

;--------------------------------
;Interface Settings

  !define MUI_HEADERIMAGE
  !define MUI_HEADERIMAGE_BITMAP "${NSISDIR}\Contrib\Graphics\Header\nsis.bmp" ; optional
  !define MUI_ABORTWARNING

  !insertmacro MUI_PAGE_LICENSE "OpenBD-OTR\license\openbd.license"
  !insertmacro MUI_PAGE_COMPONENTS
  !insertmacro MUI_PAGE_DIRECTORY
  !insertmacro MUI_PAGE_INSTFILES

  !insertmacro MUI_UNPAGE_CONFIRM
  !insertmacro MUI_UNPAGE_INSTFILES

;UninstPage uninstConfirm
;UninstPage instfiles
The top 3 can be used or not. I preferred to add a header image to the installer dialogs. Made it look a bit more professional. For this image use a standard image file from the NSIS Software or the one with the OpenBD logo provided above.
The !insertmacro MUI_PAGE_LICENSE can be used or not. In my case I selected to display the GNU 3 license used in OpenBD.
MUI_PAGE_COMPONENTS gives you the opportunity to create a start menu or not. Your application is always selected and can't be de-selected.
MUI_PAGE_DIRECTORY is the dialog to define where to install your App. Since we previously defined the following:
; The default installation directory
InstallDir C:\MyCompany\OpenBD-OTR
The default value will be C:\MyCompany\OpenBd-OTR
MUI_PAGE_INSTFILES is simply the page which is displayed during the installation
MUI_UNPAGE_CONFIRM and MUI_UNPAGE_INSTFILES are the 2 dialogs which will be displayed in case someone uninstalls your App. First they have to confirm that they really want to uninstall and then the screen showing the process of the uninstall.
;--------------------------------
;Languages

  !insertmacro MUI_LANGUAGE "English"
Here you define the language for the installer. There is an example in the NSIS installation how to create a language selection Page. I didn't need this so I just selected one language, in this case English.
From here on the heavy work starts. Our files to be installed. To make it easy I will add my otr_setup.nsi in a cut version where just the OpenBD.Local and the OpenBD itself is included and where you simply add your own files.
There is an Install and an Uninstall section.
; The stuff to install
Section "OTR (required)"

  SectionIn RO

  ; Set output path to the installation directory.
  SetOutPath $INSTDIR
Section references the MUI_PAGE_COMPONENTS. Remember that the user can't deselect your application only the start menu.
First to define is the Path which is done with the SetOutPath. Unfortunately (since we're creating this script manually) we have to define this statement for all subdirectories.
  ; Put file there
  File "OpenBD-OTR\openbd-local.ini"
  File "OpenBD-OTR\openbd-readme.txt"
  File "OpenBD-OTR\openbd.exe"
  File "OpenBD-OTR\openbd.ini"
  File "OpenBD-OTR\openbd.jar"
  File "OpenBD-OTR\openbdlocal.jar"
  File "otr_setup.nsi"

  SetOutPath $INSTDIR\jre\bin\client

  File "OpenBD-OTR\jre\bin\client\classes.jsa"
  File "OpenBD-OTR\jre\bin\client\jvm.dll"
  File "OpenBD-OTR\jre\bin\client\Xusage.txt"

  SetOutPath $INSTDIR\jre\bin\new_plugin

  File "OpenBD-OTR\jre\bin\new_plugin\msvcr71.dll"
  File "OpenBD-OTR\jre\bin\new_plugin\npjp2.dll"
As seen above we have to use the SetOutPath for each directory.
First I install the main openbd-local files, and in my case, I included the NSIS script as well. You really don't have to do this!
Changing the directory to the JRE and then list every file in each directory. This list will be pretty long so I'm not gonna waste HTML Bytes for this. My script is, as mentioned, attached separately containing the complete OpenBD.Local and OpenBD.
  ; Write the installation path into the registry
  WriteRegStr HKLM SOFTWARE\OpenBD-OTR "Install_Dir" "$INSTDIR"

  ; Write the uninstall keys for Windows
  WriteRegStr HKLM "Software\Microsoft\Windows\CurrentVersion\Uninstall\OpenBD-OTR" "DisplayName" "OpenBD-OTR"
  WriteRegStr HKLM "Software\Microsoft\Windows\CurrentVersion\Uninstall\OpenBD-OTR" "UninstallString" '"$INSTDIR\uninstall.exe"'
  WriteRegDWORD HKLM "Software\Microsoft\Windows\CurrentVersion\Uninstall\OpenBD-OTR" "NoModify" 1
  WriteRegDWORD HKLM "Software\Microsoft\Windows\CurrentVersion\Uninstall\OpenBD-OTR" "NoRepair" 1
  WriteUninstaller "uninstall.exe"

SectionEnd
The Application Section ends with some Registry stuff which is used for the uninstaller part. What you will need to change here will be the OpenBD-OTR and change it to something that fits your application.
The next section will be for the Start menu.
; Optional section (can be disabled by the user)
Section "Start Menu Shortcuts"

  CreateDirectory "$SMPROGRAMS\OpenBD-OTR"
  CreateShortCut "$SMPROGRAMS\OpenBD-OTR\Uninstall.lnk" "$INSTDIR\uninstall.exe" "" "$INSTDIR\uninstall.exe" 0
  CreateShortCut "$SMPROGRAMS\OpenBD-OTR\OpenBD-OTR.lnk" "$INSTDIR\openbd.exe" "" "$INSTDIR\openbd.exe" 0

SectionEnd
The same thing to change in this part. the Application Name OpenBD-OTR into your Application Name. It's shortcuts for the openbd.exe and the uninstaller.exe which will show up in the start-menu.
; Uninstaller

Section "Uninstall"

  ; Remove registry keys
  DeleteRegKey HKLM "Software\Microsoft\Windows\CurrentVersion\Uninstall\OpenBD-OTR"
  DeleteRegKey HKLM SOFTWARE\OpenBD-OTR

  ; Remove files and uninstaller
  Delete "$INSTDIR\openbd-local.ini"
  Delete "$INSTDIR\openbd-readme.txt"
  Delete "$INSTDIR\openbd.exe"
  Delete "$INSTDIR\openbd.ini"
  Delete "$INSTDIR\openbd.jar"
  Delete "$INSTDIR\openbdlocal.jar"
  Delete "$INSTDIR\otr_setup.nsi"
  Delete "$INSTDIR\jre\bin\client\classes.jsa"
  Delete "$INSTDIR\jre\bin\client\jvm.dll"
This is pretty much the same list as in the installation part. Only the file path is based on the Installation Directory. It starts by deleting some Registry Keys.
  ; Delete $INSTDIR\otr_setup.nsi
  Delete $INSTDIR\uninstall.exe

  ; Remove shortcuts, if any
  Delete "$SMPROGRAMS\$INSTDIR\*.*"

  ; Remove directories used
  RMDir /r "$SMPROGRAMS\OpenBD-OTR"
  RMDir /r "$INSTDIR\jre"
  RMDir /r "$INSTDIR\license"
  RMDir /r "$INSTDIR\webapp"
  RMDir "$INSTDIR"

SectionEnd
The section ends by deleting the uninstall.exe and the Start Menu shortcuts. Removing Directories etc.
I am pretty sure that the RMDir /r would delete directories and files in one go but I decided to go the filelist way. 1, I had the list from the installation part and could pretty quick replace the File with Delete and the source Path to the $INSTDIR. 2. The uninstall dialog box will show a progress that it's working and what it is doing. I'm pretty sure you can select the RMDir /r here though.
Time to compile
Now we're ready to create our installer.
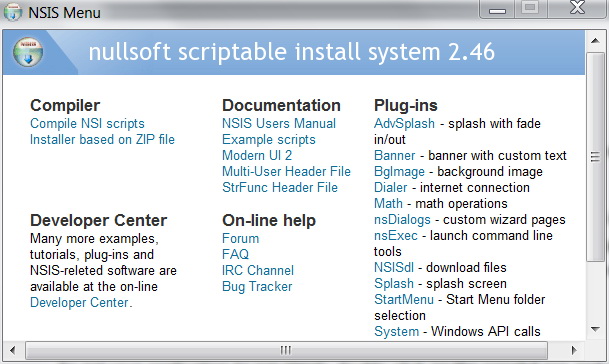
Start the NSIS "Compile NSI Scripts"

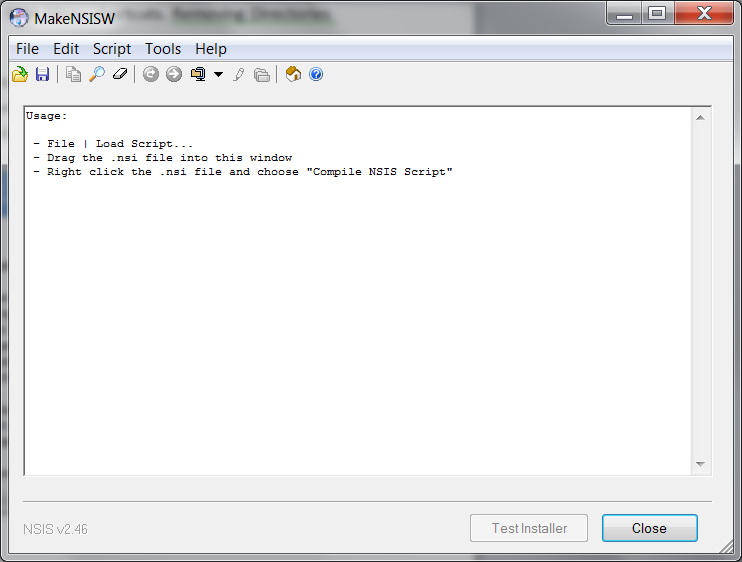
As you can see you have more options to compile your script. A simple way is simply to drag the file onto the NSIS compiler.
In the scripts Menu you can select compression level. On my OTR Project the difference between the default version and the Best Compressor was about 15 MB. Best Compression takes of course a bit longer but the installer-file a user has to download will be smaller, so this was my selection.
When done you test your setup program right away from the compiler by just clicking on the "Test Installer" button.
That's All Folks!
I hope this little guide will help you get started with OpenBD.Local, Your own OpenBD Application and the NSIS Installer.
If you have any questions feel free to contact me over dothe...now@gmail.com or over the mailing list at openbd.org and I will do my best to help you out. If not me than there are lots of really good people on this mailing list that are always there to help out!!
Mats Strömberg
NETWORK 23
Switzerland
